OPPO R15
Y97虽然也是用6771但是emmc和ram跟不上,所以导致系统没有R15流畅。
R15也算是当年的旗舰机
玻璃后盖,金属机身,6+128

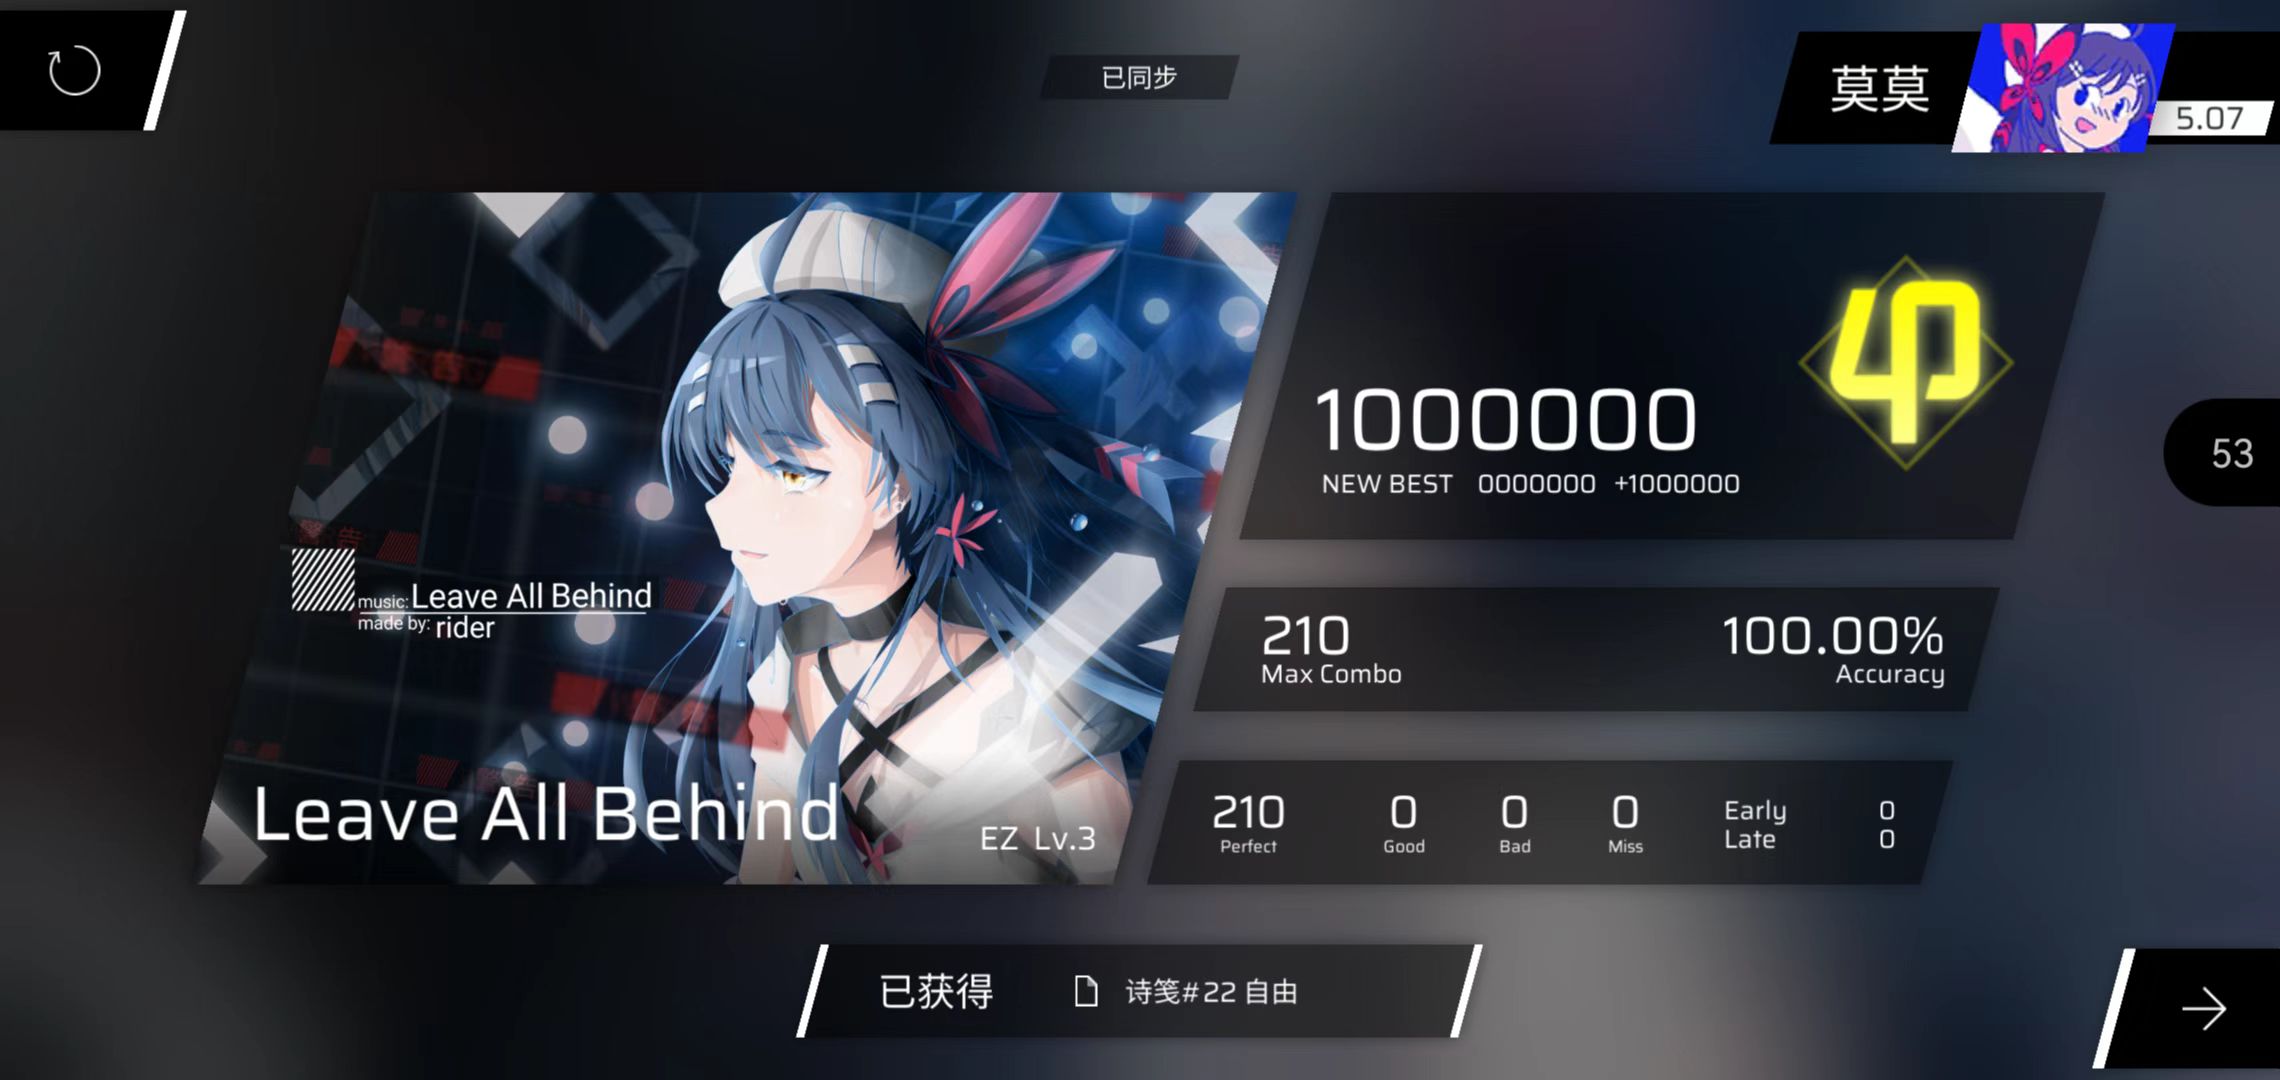
OFRP展示


系统展示


有些人会去抽烟,用刀片划胳膊,我不会这样做。
但还是很难熬,本人一半内向,一半外向,一般看不出我内向。
现在理科已经听不懂了,这次考试必定废。源于热爱而去学习 理科 现在非常不喜欢
想念过去,焦虑未来。
New:
~~ENTP 没必要用几个字母去定义自己
– 弱者思维和强者思维
From Bilibili
感谢各位的鼓励,谢谢。
]]>OPPO R15
Y97虽然也是用6771但是emmc和ram跟不上,所以导致系统没有R15流畅。
R15也算是当年的旗舰机
玻璃后盖,金属机身,6+128
教师都是年轻教师,有没结婚的。增加了干事,管一些杂事的,都是大学毕业的,应该有4个人。
食堂的饭菜种类要多,价格也贵,原因就是食堂外包的,我们初中没有外包,菜的种类就那几个,价格也便宜。
高中两周回家一次,应该是俩天,初中每周都回一天。
教室电脑是希沃的,初中是鸿合的。有四个风扇,初中一个也没有。
军训一周把我晒黑了。今天又要走了。
]]>所以他们的配件是通用的。
可以魔改的部分有指纹,Ram,尾插,前置摄像头。
Y97和Z3i的主板是一样的,把指纹座子焊在主板上,安装上指纹模组,换上Z3i的后盖就OK。
Ram需要拆主板,将4G换为6G,官方是支持6G的,SOC是支持8G的,所以也可以换8G的Ram
尾插换Z3i的尾插,Y97的尾插最高跑到10W,只有一个IC,Z3i可以跑到18W,有两个IC
Y97的前置摄像头是16MP,Z3i的前置摄像头是26MP。
经过测试Y97使用Z3i的尾插会出现自动重启现象,原因是内核读取温度计算方式问题,内核读取电池温度是通过尾插读取,由于计算问题,会显示电池温度超过68℃,超过这个温度手机会自动重启。
]]>因为学校要用,所以就办了。
预留手机号当时就该填我的,每次验证码都发ta手机上了。
网银默认开通了,可绑定手机APP,海外Paypal也可以。

实体卡,没有信息的社保卡,全国稀有。
Paypal绑定


解决方法:


解决:
BoardConfig.mk中添加:BUILD_BROKEN_DUP_RULES := true
在 Android 或其他构建系统中,BUILD_BROKEN_DUP_RULES := true 这行代码通常用于临时禁用重复规则的检查。在构建系统中,重复规则通常指的是同一个目标被多个构建规则定义的情况,这在正常情况下是不被允许的,因为它会导致构建过程中的冲突和不确定性。
然而,在某些特定情况下,你可能需要临时绕过这些检查,比如:
使用 BUILD_BROKEN_DUP_RULES := true 时,需要格外小心,因为它可能会隐藏一些潜在的构建问题。一旦不再需要绕过这些检查,应该尽快将其设置回 false,以确保构建系统的完整性和稳定性。
在实际操作中,确保你了解为什么需要这样做,并且在可能的情况下,尽快解决导致需要禁用重复规则的根本原因。这有助于维护构建系统的健康和项目的长期可持续性。
BoardConfig.mk中添加:USE_XML_AUDIO_POLICY_CONF := 1
注意:本人非专业 Android 开发者,本文仅供参考,如有错误,欢迎指正!
Prebuilt Vendor, 顾名思义, 预编译 Vendor。指的是使用厂商已经编译好的 Vendor 进行 Custom 适配。这样可以大大降低适配难度, 减少适配调试时间。
Google 在 Android 8.0 引入了 PT(Project Treble), 这使得 Android Custom ROM 的适配和调试难度大大降低。再加上今年 Google 再次引入 GRF(Google Requirements Freeze) aka Vendor Freeze, 这使得适配难度再次降低。
在 Android 8.0 之前, 要适配 Custom ROM, 需要通过 AOSP, CAF 或其它芯片, 硬件厂商开源的源码编译设备硬件所需要的运行库, HAL 或驱动, 且每次 Android 大版本升级都需要重新编译, 且极有可能在新版本 Andorid 运行或编译中出现问题, 需要等待源码更新修复或自己手动修复。
在引入 PT, GRF 后, 我们可以直接使用Stock ROM 中的 Vendor, 只需要编译 Kernel 和 System 即可, 且因为 GRF 的引入, Vendor 至少可以兼容 3 个大版本的 Android 更新。(例如小米 12 预装 Android 12, VNDK 版本 32, 则此版本的 Vendor image 至少可以兼容到 Android 15, VNDK 35)
获取安卓设备树和Vendor Blobs
Auto-Firmware-Dumper: Auto-Firmware-Dumper (github.com)
完成之后应该是这样的
[android_vendor_vivo_k71v1_64_bsp]:Vendor Blobs
[lineage_device_vivo_k71v1_64_bsp]:LineageOS Tree
[dump_vivo_k71v1_64_bsp]:ROM的所有解包文件(包括预编译内核,内核DTS,lineage-device-tree,system,vendor)
编译环境:Ubuntu 22.0.4
首先是安装必备的软件工具包:
sudo apt-get install git-core gnupg flex bison build-essential zip curl zlib1g-dev libc6-dev-i386 x11proto-core-dev libx11-dev lib32z1-dev libgl1-mesa-dev libxml2-utils xsltproc unzip fontconfig

出现这个按Tab键选择OK
安装repo,可以自己下载最新版本,也只直接使用ubuntu的软件包安装:
sudo apt-get install repo
设置git的用户信息:
1 | git config --global user.name "user name" |
创建一个目录
mkdir lineage
然后在这个目录下面初始化Android系统 Repo
1 | 初始化 repo |
-u后面是LineageOS仓库的清单文件地址, -b是我们要拉出来的代码分支,可以是分支名称,也可以是tag名称。
然后就可以调用repo sync来下载代码了,这个过程可能需要等待几个小时,看你的网速,可以在后面加上-c -j线程数来加快速度,-c表示拉当前分支,-j开启多个线程下载,如:
repo sync -c -j16
下载过程中如果中断了,重新执行这个命令可以继续下载,如果有遇到错误说有.lock文件,去子文件夹的.git文件夹下面找到相关的lock文件删除再重试就行了。
repo在国内有镜像,可以直接去北外或者tuna的源去下载。
1 | curl https://mirrors.bfsu.edu.cn/git/git-repo -o ~/bin/repo |
因为repo在每次启动时,会检查是否有更新,所以把更新的源也添加进你的.bashrc里。
1 | export REPO_URL='https://mirrors.bfsu.edu.cn/git/git-repo' |
可以开始编译了吗?并不,刚刚同步的只是系统的主代码,这些代码是各种设备能通用的部分,要使这些代码能够在你的机器上运行,我们还需要有设备独有的代码。这些一般是设备树、内核还有vendor blob.
设备树是你设备编译所需要的参数文件,里面指定了你的设备所需要的有关的配置
内核是你设备运作的核心,里面包含有许多驱动你设备运行的程序,比如wifi,触摸屏,蓝牙等各种硬件的驱动程序,厂商愿不愿意开放该设备的内核源码,就决定了这台设备能不能很好的移植这些第三方的系统。
vendor则是各种外围硬件的驱动,里面一般是一堆的so库,一般绝大多数的内容提取自于官方的rom.
了解了上述的概念,现在就可以去拿所需要的东西了。
就是把需要的东西手动放到指定的位置。如果你要构建的系统没在官方的支持范围内,那就需要你自己去找相关的内容。
设备树和内核可以在github上搜索(如果有的话)。
对于设备树,一般搜索的关键词为device_devicecodename,如device_k71v1_64_bsp 。本地工作目录为device/vivo/k71v1_64_bsp
对于内核,一般是kernel_brand_chipsetcode,如kernel_vivo_k71v1_64_bsp 。本地工作目录为kernel/vivo/k71v1_64_bsp
有内核源码可以添加上一步,不过MTK是没有内核源码的,除非手机厂商公开。(这里使用预编译内核)
对于一些设备还需要自己去下载vendor ,本地工作目录为vendor/vivo/k71v1_64_bsp
source build/envsetup.sh
初始化编译环境后
输入lunch 可以看到如下内容:

输入序号,我这里是14,用userdebug
没有错误的话,会显示这些内容:

最后,m bacon 开始编译。
成功后会输出如下内容:
但是我没成功😭
momo54181/android_vendor_vivo_k71v1_64_bsp: Vendor tree for k71v1_64_bsp (github.com)
momo54181/lineage_device_vivo_k71v1_64_bsp: LineageOS compatible tree for k71v1_64_bsp (github.com)
求大佬修复,https://blog.mocn.top/posts/44490
引用内容:
记录再次编译Android系统的坑 | 码农明明桑 (isming.me)
快速上手 Android Custom ROM 适配 - Prebuilt Vendor | Lynnrin’s Blog
]]>先来说一下网络结构,光猫桥接,主路由拨号,所有设备流量经过旁路游到达主路由最后到互联网。
IPv4:由主路由分发地址,网关(通过DHCP选项来将网关改为旁路由IP),DNS服务器
IPv6:由主路由分发地址,网关,DNS服务器
在之前的话呢,如果你想要访问Google,只能走IPv4,IPv6是直连的。
这样就会导致一系列的问题,比如ChatGPT的IPv6的IP没有被墙,那么就会走ipv6,导致连接重置。
谷歌的IPv6被墙,连接不通,那么就会走IPv4线路。
所以访问谷歌没啥问题,但是访问ChatGPT就会出现问题。

让流量也IPv6流量经过旁路由
主路由这边Lan口这样配置


将DHCPv6关闭后,主路由将不再分发DNS服务器
旁路由设置


最后你就会发现

有两个ipv6默认网关,不用管他,默认是走旁路由
在clash里就可以看到


2020年我搭建了自己的第一个博客,域名是mo66.rf.gd,使用的是wordpress来搭建,第一开始是使用免费的云主机,不过比较容易跑路,具有不稳定性,所以后来使用ifastnet.com来托管,这下不用怕跑路,但是又出现了一个新的问题,服务器在英国,这延迟,打开都需要3min,后来又搞了个freenom的免费域名moblog.ml,使用cloudflare cname接入,优选是taoduodian.cfcdn.cc,现在ping了一下,发现还可以用,延迟也还可以。
更新了几个月也不更新了,2022年年底发现了别人的Hexo博客,非常美观,于是我也决定要搞一个博客,接下来是正文
准备材料
域名你可以买国内的,也可以买海外的。
国内推荐腾讯云,阿里云,海外推荐NameSilo(支持支付宝,银联,PayPal)
腾讯云实名需要年满18周岁,阿里云没有必须满18周岁的限制。
关于备案,必须是国内的域名提供商才可以进行ICP备案,海外的不行。
关于域名注册,国内域名注册商不能注册含有china,中国字符串的域名,海外可以。
你想要便宜一点的?
可以选择纯数字xyz后缀的,一年8块,续费也是(具体看注册商),还可以选择top后缀的域名,一年20多块,也挺不错的。
请根据以下步骤检查您的域名是否支持ICP备案。
检查域名后缀是否已获批复
国内有阿里DNS,DNSPod,京东DNS等等,海外有Cloudflare,具体查看支持分线路|电信|联通|移动|国外等|解析的免费DNS服务 | Momo5418’s Blog (mocn.top)
我目前在使用阿里的DNS解析服务,没有解析个数限制,负载均衡也没有限制,支持 联通/电信/移动/教育网/境外 分流,个人推荐阿里云DNS
DNSPod:负载均衡2条,URL 转发2条,海外在美国解析比较不行,在ping.sx测试的时候美国全都是超时的,不知道为啥,后来换了京东DNS和阿里DNS没有出现过这种情况。
Ali DNS :运营商线路:支持按联通、电信、移动、教育网、鹏博士、广电网智能解析,但不细分到省份;(2)海外地区线路:支持,但不细分到大洲、国家;
Cloudflare就不介绍了,对全球友好,延迟极低,支持DNSSEC,而且是免费的,免费的DDOS防御。好了说完了。
PS:Cloudflare的介绍中国大陆除外,不过支持DNSSEC和免费的DDOS防御是真的。Cloudflare可以提供博客的海外线路。
Vercel,不支持自定义SSL证书,线路为Anycast,大陆时好时坏,没有IPv6线路
Netlify,支持自定义SSL证书,线路为新加坡/amazon.com,有IPv6线路
CDN 的全称是 Content Delivery Network,即内容分发网络。 CDN 是构建在现有网络基础之上的智能虚拟网络,依靠部署在各地的边缘服务器,通过中心平台的负载均衡、内容分发、调度等功能模块,使用户就近获取所需内容,降低网络拥塞,提高用户访问响应速度和命中率。
简单来说就是用来给网站加速用的,不至于使你的原站变得堵塞。
如果你的域名已经备案,可以选择国内CDN提供服务,比如七牛云,阿里云,腾讯云,又拍云,多吉云
1.带宽和流量:又拍云每月提供可以为用户免费提供15GB的流量。
在页脚挂上又拍云的 LOGO(就像本站页脚一样),便会每月赠送 10 GB 存储空间和 15 GB 流量。
1.带宽和流量:多吉云CDN提供每月20GB的存储空间和20GB的流量,HTTPS 资源包每月 200w 次(境内境外通用)。
既然有两个免费的CDN可以白嫖,那要选择那个呢?
我的回答是:全都要。(真不要脸)
忽略忽略忽略忽略忽略忽略忽略忽略忽略忽略忽略忽略忽略忽略忽略忽略忽略忽略忽略忽略忽略忽略忽略忽略忽
ICP备案是指在中国大陆地区提供互联网信息服务的网站必须向中国工业和信息化部(MIIT)申请的备案。ICP是“Internet Content Provider”的缩写,即互联网内容提供商。备案的目的是为了规范互联网信息服务管理,保障网络安全,维护国家安全和公共利益,以及保护公民、法人和其他组织的合法权益。
ICP备案流程通常包括以下几个步骤:
**1.**准备资料:网站负责人需要准备包括但不限于网站负责人的身份证件、网站域名证书、网站内容说明等资料。
**2.**在线提交:通过工业和信息化部的备案系统(备案管理系统)提交备案申请。
**3.**审核:提交的资料将由相关部门进行审核,审核内容包括资料的完整性、真实性以及网站内容是否符合国家法律法规。
**4.**备案成功:审核通过后,网站将获得一个备案号,通常会显示在网站的底部。
**5.**公示:备案信息将在工业和信息化部的官方网站上公示,供公众查询。
**6.**备案信息更新:如果网站信息发生变化,如负责人变更、域名变更等,需要及时更新备案信息。
需要注意的是,ICP备案是针对在中国大陆提供服务的网站,如果网站服务器不在中国大陆,可能需要遵循当地的法律法规进行备案。此外,ICP备案不等同于ICP经营许可证,后者是针对提供有偿信息服务的网站,需要满足更严格的条件和要求。
忽略忽略忽略忽略忽略忽略忽略忽略忽略忽略忽略忽略忽略忽略忽略忽略忽略忽略忽略忽略忽略忽略忽略忽略忽
]]>
当我们老师说 真不错,英语听力白给,但是山西中考是不会给你机会的
明天又要去,真服了。
有的人该不会把准考证丢了吧😨
]]>
从4月6日就开始玩了,终归是音游,冰与火之舞是在PC端,而Phigros而是在移动端。
毕竟冰与火之舞也快玩腻了,索性就下载来玩了。

然后

再然后,真是没想到。φ
最后,当重生失败了,不要碰虚假的方舟,那不是救赎,最后的魔王曲才是救赎

一切都结束了。
感觉心之所向和重生这两Music挺不错的
Welcome to Phigros!
]]>愿各位站长在新的一年里免受DDOS祝福.
龙年新大运,希望每位知友们心想事成!万事如意!
]]>
是的,你没有看错,给TWRP添加解密功能.
Data加密分为FDE(全磁盘加密) 和 FBE(文件基加密)
当你看到encryptable=/dev/block/platform/bootdevice/by-name/metadata为FDE加密
当你看到forcefdeorfbe=/dev/block/platform/bootdevice/by-name/metadata默认为FDE加密,可以在开发者选项里转换为文件级加密(FBE)
当你看到fileencryption=aes-256-xts为FBE加密
不知道为啥Y97还在用FDE加密,出厂都是安卓8的设备了。
先说一下解密思路:twrp启动——加载servicemanager hwservicemanager vndservicemanager——加载TrustonicTEE(Start mcDriverDaemon)——加载gatekeeper(可选,实测不加载也可以解密,对于FDE设备)——加载keymaster——TEE解密——读取data
个人总结
下面演示机型Vivo Y97(Vivo V11i)
参考设备树:momo54181/android_device_vivo_k71v1_64_bsp (github.com)
momo54181/android_device_oppo_PACM00: Device Tree For OPPO R15 (github.com)
这种加密方式比较老旧常在2018年之前的机子上出现,比如 金立M6 魅族Note5 Vivo Y97 OPPO R15
flag通常为
/dev/block/platform/bootdevice/by-name/userdata /data ext4 noatime,nosuid,nodev,noauto_da_alloc,discard,errors=panic wait,check,formattable,quota,resize,reservedsize=128m,forceencrypt=/dev/block/platform/bootdevice/by-name/metadata,
对于OPPO设备
/dev/block/platform/bootdevice/by-name/userdata /data ext4 noatime,nosuid,nodev,noauto_da_alloc,errors=panic,async_discard wait,check,formattable,quota,resize,reservedsize=128m,forcefdeorfbe=/dev/block/platform/bootdevice/by-name/metadata
加密参数只有一个forceencrypt=/dev/block/platform/bootdevice/by-name/metadata,或者forcefdeorfbe=/dev/block/platform/bootdevice/by-name/metadata
Metadata分区不能使用ext4挂载可读写
通常在较新的机器上使用
/dev/block/by-name/userdata /data f2fs noatime,nosuid,nodev,discard,noflush_merge,fsync_mode=nobarrier,reserve_root=134217,resgid=1065,inlinecrypt wait,check,formattable,quota,reservedsize=128m,latemount,resize,checkpoint=fs,fileencryption=aes-256-xts:aes-256-cts:v2+inlinecrypt_optimized,keydirectory=/metadata/vold/metadata_encryption,fsverity
你可以看到加密类型fileencryption=aes-256-xts:aes-256-cts:v2密钥位置keydirectory=/metadata/vold/metadata_encryption
fileencryption为FBE加密
TW_INCLUDE_CRYPTO := true # 添加加密支持
TW_INCLUDE_CRYPTO_FBE := true # 添加 FBE加密支持
对于FBE加密以及Matadata存储密钥的需要额外添加下面两条
BOARD_USES_METADATA_PARTITION := true #元加密分区
TW_INCLUDE_FBE_METADATA_DECRYPT := true #Metadata解密分区
TWRP_INCLUDE_LOGCAT := true #开启Logcat,方便看log
TARGET_USES_LOGD := true #开启logd,方便看log
这里主要说keymaster版本和gatekeeper版本,在高安卓设备不再使用keymaster而是keymint
方法一:解包原厂rec镜像,打开init.recovery.mt6771.rc init.recovery.platform.rc init.recovery.svc.rc之类的文件
以vivo y97为例init.recovery.platform.rc init.recovery.svc.rc存放解密信息
init.recovery.platform.rc(部分):
on init
mkdir /mnt/vendor/persist 0771 system system
symlink /mnt/vendor/persist /vendor/persist
symlink /vendor/lib64/hw/libMcGatekeeper.so /vendor/lib64/hw/gatekeeper.${ro.product.board}.so
symlink /vendor/lib64/hw/libMcTeeKeymaster.so /vendor/lib64/hw/keystore.${ro.hardware}.so
on property:recovery.service=1
start vendor.keymaster-3-0-trustonic
start gatekeeper-1-0
start guardianangle
service keymaster-3-0 /vendor/bin/android.hardware.keymaster@3.0-service
disabled
user root
group root drmrpc
seclabel u:r:recovery:s0
service keymaster-4-0 /vendor/bin/android.hardware.keymaster@4.0-service
disabled
user root
group root drmrpc
seclabel u:r:recovery:s0
service vendor.keymaster-4-0-trustonic /vendor/bin/hw/android.hardware.keymaster@4.0-service.trustonic
disabled
user root
group root drmrpc
seclabel u:r:recovery:s0
service vendor.keymaster-3-0-trustonic /vendor/bin/hw/android.hardware.keymaster@3.0-service.trustonic
disabled
user root
group root drmrpc
seclabel u:r:recovery:s0
service gatekeeper-1-0 /vendor/bin/android.hardware.gatekeeper@1.0-service
disabled
user root
group root
seclabel u:r:recovery:s0
标粗体的为你对应的版本
Q:为啥keymaster版本有两个
A:有不一定代表他都用,
on property:recovery.service=1
start vendor.keymaster-3-0-trustonic
start gatekeeper-1-0
start guardianangle
这里他只出现了keymaster3.0没有出现4.0,所以4.0可以不用。
方法二:手机下载密钥认证打开会显示你的keymaster版本(对TEE损坏设备不可用)
对照设备树进行添加
Add FBE · momo54181/android_device_oppo_PACM00@69d6e0d (github.com)
Fix Crypto · momo54181/android_device_oppo_PACM00@d315327 (github.com)
Add for OPPO FBE By Momo5418 · momo54181/android_device_oppo_PACM00@90484cd (github.com)
#Add By Momo5418 FBE Fixed
on property:crypto.ready=1
start vendor.keymaster-3-0-trustonic
start keymaster-3-0
start gatekeeper-1-0
on property:crypto.ready=0
stop mobicore
stop servicemanager
stop hwservicemanager
stop keymaster-3-0
stop gatekeeper-1-0
on property:ro.crypto.state=unsupported
stop mobicore
stop servicemanager
stop hwservicemanager
stop keymaster-3-0
stop gatekeeper-1-0
on property:ro.crypto.state=unencrypted
stop mobicore
stop servicemanager
stop hwservicemanager
stop keymaster-3-0
stop gatekeeper-1-0
on property:twrp.decrypt.done=true && property:twrp.all.users.decrypted=true
stop mobicore
stop servicemanager
stop hwservicemanager
stop keymaster-3-0
stop gatekeeper-1-0
对于vivo设备
需使用下面的挂载flag
/dataext4/dummydeviceflags=altdevice=/dev/block/platform/bootdevice/by-name/userdata;encryptable=/dev/block/platform/bootdevice/by-name/metadata

解决办法:检查是否存在mcDriverDaemon
1.可能是system/或者vendor/vintf/manifest.xml配置有短缺
解决办法:将vendor/vintf/manifest.xml复制到system/vintf/manifest.xml
2.可能是init.recovery.cpu代号.rc 未加载keymaster 例如:


正常报错,不影响解密。

Load decryption key
Cannot open key SO (No such file or directory)
key decryption missing, ignore
这些日志信息表明在尝试加载解密密钥的过程中遇到了问题。具体来说:
1.Load decryption key: 这表明系统正在尝试加载一个解密密钥。
*2.Cannot open key SO (No such file or directory): 这是一个错误信息,表明系统无法找到指定的密钥文件。*key SO 可能指的是一个特定的密钥文件,而 No such file or directory 表示该文件不存在于预期的路径中。
3.key decryption missing, ignore: 这是一个警告信息,表明由于缺少解密密钥,系统将忽略解密操作。这可能是因为密钥文件丢失、损坏或路径错误。
原因不明,可能会导致无法解密Data
]]>目前cloudflare自选IP最佳路线为
电信:线路落地:圣何塞(SJC),CDN节点:希思罗(LHR)
联通:NTT
移动:香港(HKG)
目前IP已经整合到一个域名:cf-cdn.mocn.top

2024.09.17-16:10
电信:
IP 地址 已发送 已接收 丢包率 平均延迟 下载速度 (MB/s)
104.19.46.164 4 4 0.00 157.10 15.97
104.19.77.49 4 4 0.00 157.08 13.91
104.19.87.68 4 4 0.00 155.37 13.27
104.19.111.77 4 4 0.00 155.11 12.11
104.19.73.11 4 4 0.00 156.21 10.34
104.19.115.72 4 4 0.00 155.67 6.78
104.19.41.237 4 4 0.00 156.07 5.19
172.65.5.181 4 4 0.00 156.29 0.00
172.65.0.0 4 4 0.00 157.20 0.00
172.65.12.244 4 4 0.00 157.22 0.00
移动:104.19.73.11 104.19.46.164
测试地点:山西
89.116.250.99
185.162.230.10
203.24.102.202
154.211.8.2
103.160.225.20
103.98.74.136
不是反代IP
使用方法:打开文件夹内的start.bat即可
]]>运营商: 中国联通
两周前的某一天,线路维护(不知道是不是),光纤中断一天后正常
在这几天后,断网,浏览器跳转http://218.26.145.14:8080/shx_691/callForErrDetil.action
获取到的IP从公网IP转为了内网IP
光猫日志:2023-09-07 02:17:04 [Critical][配置日志] 终端:IACCESS(120.132.6.77),执行结果:Fail,操作命令:BUCPE.SiteSpeed,ErrorInfo:http://218.26.145.14:8080/shx_691/callForErrDetil.action, 218.26.145.14, Error_InitConnectionFailed, 2, 2, 0, 2
改桥接,电脑PPPOE拨号628错误
打10010问了一下,确实是宽带欠费
你猜欠了多少,1598.16元
这么算的话,学校欠了33561.36元
班里是2021年装的,但是10010告诉我是2020.8.17号安装的宽带
诡异
总算是有网了,又可以在机房Play了
]]>先来看效果

这个速度也不错了,没办法,受限于Pcie2.0.
先上官网下载BIOS

将其解压

打开 BIOS添加NVMe工具\MMTool_5.07\MMTool_5.07.exe

把你的BIOS加载进来

选中CORE_DXE

添加NVMe驱动


然后保存

推荐rom格式
找到你的CH341A编程器


给BIOS刷上,插回主板,开机。
启动项有PATA SS: 就代表成功了

软件下载地址: Alist
]]>
这猫还是挺可爱的
2023年7月23日加入队伍
大概2023年4月29日
拿原石抽常驻,感觉错过了很多
四件套(主角 安柏 凯亚 丽莎)耍了一个多月才去新手池抽了个诺艾尔
也不去突破,要突破净整些没用的
安柏 50级
主角60级
后面想突破没经验书了
枫丹也快要开了,到时候会有跟多好玩的Bug等着你。
2024-02-08 看完了枫丹的剧情
]]>
在写本文章之前已获得授权

不废话,开始

可以看到,显示不可上网.
直接打开浏览器输入192.168.1.1
Tips:需要全程连wifi,要不然没法弄,因为这是你家里的网关
PS:这里演示的是电信运营商的,其他运营商的可能会有所差异

看到这里你成功了50%
然后找到你家的光猫
翻到背面

这里找到密码,直接输进去打开.


把他关了就行了
]]>![]()
再说配置之前先说说我路由器的配置,路由器为中兴的E8820S,128RAM,256ROM,MT7621
当时在小黄鱼花50买的,刷的OpenWRT,废话
入站端口随便,我的是5335端口,重定向53端口到AdGuardHome

上游DNS服务器填你的OpenClash DNS监听端口
PS:在 覆写设置>常规设置>DNS监听端口 处查看
在“覆写设置”中的“DNS设置”中的“*自定义上游 DNS 服务器”打开
在下面的“NameServer”中设置国内DNS服务器,在“FallBack”中设置国外DNS服务器,在“Default-NameServer”中设置你的AdGuardHome的DNS
一些建议:国内DNS服务器地址填运营商给你的DNS,延迟低。国外DNS服务器地址填带有加密的DNS地址
比如:1.1.1.1/dns-query 1.1.1.1:853(TLS)
因为传统DNS查询数据以明文方式传输,存在暴露的风险,采用加密DNS可以有效地防止隐私泄露和DNS劫持。
走国内填运营商的就行,如果不放行也填国内加密的DNS服务器地址,如 阿里云 DNS:
https://dns.alidns.com/dns-query
Dnsmasq 是轻量级的 DHCP服务器和DNS 转发器。
网络>DHCP/DNS>高级设置>DNS 服务器端口 填53
网络>DHCP/DNS>高级设置>DNS 查询端口 留空
配置完成后重启一下路由器就可以啦
]]>通过adb shell获得su权限,使用cp命令输入修补后的boot镜像
在这之前,通过shell看了vendor文件夹中的分区表文件,发现并没有AVB验证,data分区也没有加密,系统还是userdubug版本。
CPU架构是arm-v7a,之前给电视盒子刷入过Magisk,且成功了。
据此推断,刷入Magisk应该没啥问题。
最后,Success
后期看一下配置文件,解决一下外接HDMI接口触摸驱动的问题.
刷入各种模块,改开机动画,只不过救砖不咋好搞.
]]>